Spring BootとThymeleafでLayoutを共通化する方法
Spring BootとThymeleafでLayoutを共通化する方法です。
Thymeleaf の Layoutは、Tiles のように共通レイアウトを定義する仕組みです。
ヘッダ・ナビゲーション・コンテンツ・フッタを、それぞれ部品化することで生産性・保守性の向上が図れます。
以前、「Spring Bootでヘッダ・フッタの共通化する方法」でも書きましたが、今回はもう少し実務に寄った使い方を紹介したいと思います。
ここでは Spring BootとThymeleafでLayoutを共通化する方法 を紹介します。
この記事で作られるWebアプリ
最終形はこうです。
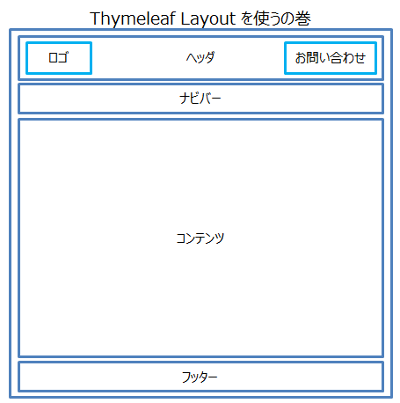
一般的な Web サイトの構成ですね。
これを Thymeleaf の Layout dialect でやってみたいと思います。この機能を利用すると、ベースとなるテンプレートページに、各コンテンツページを組み込んでページを生成することができるようになります。
環境
- Spring Boot 1.4.1
- Thymeleaf 3.0.2
- Windows7
- Java8
- Eclipse 4.6 Neon
こちらの「Spring Bootで静的ページを配置する方法」を参考に、Spring Bootのサンプルアプリを作ってみてください。すでにSpring Boot Webアプリがある場合には読み飛ばして結構です。
Layout作成
プロジェクトの pom.xml です。
・pom.xml
<project xmlns="http://maven.apache.org/POM/4.0.0" xmlns:xsi="http://www.w3.org/2001/XMLSchema-instance" xsi:schemaLocation="http://maven.apache.org/POM/4.0.0 http://maven.apache.org/xsd/maven-4.0.0.xsd">
  <modelVersion>4.0.0</modelVersion>
  <groupId>jp.demos.spbfe</groupId>
  <artifactId>spring-boot-frontend</artifactId>
  <version>0.0.1-SNAPSHOT</version>
  <parent>
    <groupId>org.springframework.boot</groupId>
    <artifactId>spring-boot-starter-parent</artifactId>
    <version>1.4.1.RELEASE</version>
  </parent>
  <properties>
    <java.version>1.8</java.version>
    <project.build.sourceEncoding>UTF-8</project.build.sourceEncoding>
    <thymeleaf.version>3.0.2.RELEASE</thymeleaf.version>
    <thymeleaf-layout-dialect.version>2.0.5</thymeleaf-layout-dialect.version>
  </properties>
  <dependencies>
    <dependency>
      <groupId>org.springframework.boot</groupId>
      <artifactId>spring-boot-starter-web</artifactId>
    </dependency>
    <dependency>
      <groupId>org.springframework.boot</groupId>
      <artifactId>spring-boot-starter-thymeleaf</artifactId>
    </dependency>
    <dependency>
      <groupId>org.springframework.boot</groupId>
      <artifactId>spring-boot-devtools</artifactId>
    </dependency>
    <dependency>
      <groupId>org.webjars</groupId>
      <artifactId>bootstrap</artifactId>
      <version>3.3.7</version>
    </dependency>
    <dependency>
      <groupId>org.webjars</groupId>
      <artifactId>jquery</artifactId>
      <version>1.12.4</version>
    </dependency>
  </dependencies>
</project>
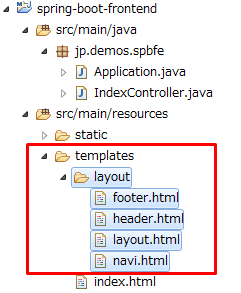
まず、templates フォルダー内に layout フォルダーを作り、パーツとなる html ファイルを配備します。
・layout.html
ベースとなるテンプレートページです。
<!DOCTYPE html SYSTEM "http://www.thymeleaf.org/dtd/xhtml1-strict-thymeleaf-spring4-4.dtd">
<html xmlns="http://www.w3.org/1999/xhtml"
      xmlns:th="http://www.thymeleaf.org"
      xmlns:layout="http://www.ultraq.net.nz/thymeleaf/layout">
<head>
  <title layout:title-pattern="$CONTENT_TITLE | $LAYOUT_TITLE">Thymeleaf de layout</title>
  <meta charset="UTF-8" />
  <meta http-equiv="X-UA-Compatible" content="IE=edge" />
  <meta name="viewport" content="width=device-width, initial-scale=1" />
  <link rel="stylesheet" media="all" th:href="@{/webjars/bootstrap/3.3.7/css/bootstrap.min.css}" />
  <link rel="stylesheet" media="all" th:href="@{/css/style.css}" />
  <!--[if lt IE 9]>
    <script src="https://oss.maxcdn.com/html5shiv/3.7.2/html5shiv.min.js"></script>
    <script src="https://oss.maxcdn.com/respond/1.4.2/respond.min.js"></script>
  <![endif]-->
</head>
<body>
<div layout:replace="~{layout/header::header}"></div>
<div layout:replace="~{layout/navi::navbar}"></div>
<div id="content" class="clearfix">
<div class="container">
  <div layout:fragment="content" th:remove="tag"></div>
</div>
</div>
<div layout:replace="~{layout/footer::footer}"></div>
<script type="text/javascript" th:src="@{/webjars/jquery/1.12.4/jquery.min.js}"></script>
<script type="text/javascript" th:src="@{/webjars/bootstrap/3.3.7/js/bootstrap.min.js}"></script>
</body>
</html>
Thymeleaf layout dialect 機能を使うにはhtmlタグに
xmlns:layout="http://www.ultraq.net.nz/thymeleaf/layout"
と記述します。
タイトルを切り替えるために layout:title-pattern を使います。「$CONTENT_TITLE」がコンテンツページのタイトルで、「$LAYOUT_TITLE」が Web サイトのタイトルになります。
<title layout:title-pattern="$CONTENT_TITLE | $LAYOUT_TITLE">Thymeleaf de layout</title>
次に、部品化したコンテンツページ(ヘッダ部など)を読み込みます。
<div layout:replace="~{layout/header::header}"></div>
これは layout フォルダー内の header.html の header という名前を付けた部分(th:fragment="名前")を、この位置に読み込むという意味になります。replace なのでタグごと置換されます。
そして、メインコンテンツの読み込みです。ここが動的に切り替わる部分となります。
<div layout:fragment="content" th:remove="tag"></div>
・header.html
ヘッダ部の html を書きます。ロゴとお問い合わせを配置する仕様です。
<!DOCTYPE html>
<html xmlns="http://www.w3.org/1999/xhtml"
      xmlns:th="http://www.thymeleaf.org"
      xmlns:layout="http://www.ultraq.net.nz/thymeleaf/layout">
<body>
<header id="global-header" layout:fragment="header">
<div class="container">
  <div id="row">
    <div class="col-sm-9 col-md-9">
      <a href="/">ロゴ</a>
    </div>
    <div class="col-sm-3 col-md-3">
      <a href="/contact/" title="Contact us">お問い合わせ</a>
    </div>
  </div>
</div>
</header>
</body>
</html>
・navi.html
ナビバーの html を書きます。各ページへ遷移するグローバルメニューですね。
<!DOCTYPE html>
<html xmlns="http://www.w3.org/1999/xhtml"
      xmlns:th="http://www.thymeleaf.org"
      xmlns:layout="http://www.ultraq.net.nz/thymeleaf/layout">
<body>
<div id="global-navbar" layout:fragment="navbar" class="clearfix">
<nav class="navbar navbar-default" role="navigation">
 <div class="container">
  <div class="navbar-header">
   <button type="button" class="navbar-toggle" data-toggle="collapse" data-target=".navbar-collapse">
   <span class="sr-only">Toggle navigation</span>
   <span class="icon-bar"></span>
   <span class="icon-bar"></span>
   <span class="icon-bar"></span>
   </button>
   <span class="navbar-brand visible-xs">メニュー</span>
  </div>
  <div class="navbar-collapse collapse">
   <ul class="nav navbar-nav">
   <li><a href="/" title="ホーム">ホーム<br/><small>HOME</small></a></li>
   <li><a href="/company/" title="会社概要">会社概要<br/><small>COMPANY</small></a></li>
   <li><a href="/service/" title="サービス">サービス<br/><small>SERVICE</small></a></li>
   <li><a href="/recruit/" title="採用情報">採用情報<br/><small>RECRIT</small></a></li>
   </ul>
  </div>
 </div>
</nav>
</div>
</body>
</html>
・footer.html
フッターの html を書きます。コピーライトを書いています。
<!DOCTYPE html>
<html xmlns="http://www.w3.org/1999/xhtml"
      xmlns:th="http://www.thymeleaf.org"
      xmlns:layout="http://www.ultraq.net.nz/thymeleaf/layout">
<body>
<div id="global-footer" layout:fragment="footer">
  <footer>
    <p class="text-right"><small>Copyright(C) Sakakibara Engineering Co.,Ltd, All rights reserved.</small></p>
  </footer>
</div>
</body>
</html>
・index.html
templates 配下の index.html にトップページを配置します。
<!DOCTYPE html>
<html xmlns="http://www.w3.org/1999/xhtml"
      xmlns:th="http://www.thymeleaf.org"
      xmlns:layout="http://www.ultraq.net.nz/thymeleaf/layout"
      layout:decorate="~{layout/layout}">
<head>
  <title>TOP PAGE</title>
  <meta name="keywords" content="springboot,thymeleaf,layout,トップページ" />
  <meta name="description" content="SpringBootとThymeleafのLayoutを使ってWebサイトを作るサンプルです。ここはトップページです。" />
</head>
<body>
<div layout:fragment="content">
<p style="height:150px;">
トップページです。
</p>
</div>
</body>
</html>
ポイントは
layout:decorate="~{layout/layout}"
です。
layout:decorate を使うことで、layout.html をベーステンプレートして扱うことができます。
ここまでできたら「mvn clean」、「mvn test」を実行して動作を確認します。
こんなページができると思います。
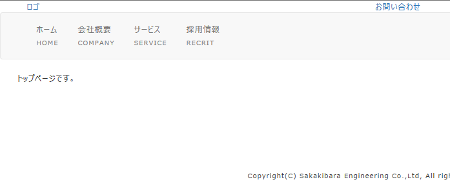
おお、いい感じですねー^^
ページを増やしてみる
では、早速ページを増やしてみましょう。
templates 配下に contents フォルダーを作って、下図のようにページを配備します。
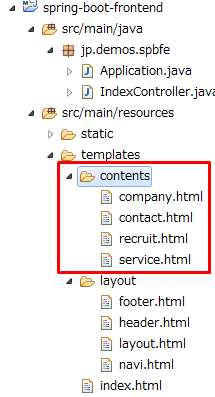
・company.html
会社情報のページを作ります。内容は index.html をコピペして文言を変えた程度ですので全ページ分の掲載は割愛します。
<!DOCTYPE html>
<html xmlns="http://www.w3.org/1999/xhtml"
      xmlns:th="http://www.thymeleaf.org"
      xmlns:layout="http://www.ultraq.net.nz/thymeleaf/layout"
      layout:decorate="~{layout/layout}">
<head>
  <title>会社情報</title>
  <meta name="keywords" content="springboot,thymeleaf,layout,会社情報" />
  <meta name="description" content="SpringBootとThymeleafのLayoutを使ってWebサイトを作るサンプルです。ここは会社情報のページです。" />
</head>
<body>
<div layout:fragment="content">
<p style="height:150px;">
会社情報のページです。
</p>
</div>
</body>
</html>
他のページもコピペで作ってみてください。
・IndexController
各ページへ遷移できるように、コントローラークラスを変更します。
package jp.demos.spbfe;

import org.springframework.stereotype.Controller;
import org.springframework.web.bind.annotation.RequestMapping;
import org.springframework.web.bind.annotation.RequestMethod;

@Controller
public class IndexController {
  @RequestMapping(value = "/", method = RequestMethod.GET)
  String index() {
    return "index";
  }
  @RequestMapping(value = "/company/", method = RequestMethod.GET)
  String comapny() {
    return "contents/company";
  }
  @RequestMapping(value = "/service/", method = RequestMethod.GET)
  String service() {
    return "contents/service";
  }
  @RequestMapping(value = "/recruit/", method = RequestMethod.GET)
  String recruit() {
    return "contents/recruit";
  }
  @RequestMapping(value = "/contact/", method = RequestMethod.GET)
  String contact() {
    return "contents/contact";
  }
}
「mvn clean」、「mvn test」を実行して動作を確認します。
各グローバルメニューをクリックしてページ遷移を確認しましょう。

おおお、うまくいきましたねー^^
参考サイト
・Rename layoutdecorator to layoutdecorate · Issue #95 · ultraq-thymeleaf-layout-dialect · GitHub
・[MAJOR FEAT] Fragment Expressions · Issue #451 · thymeleaf-thymeleaf · GitHub
まとめ
Spring BootとThymeleafでLayoutを共通化する方法を紹介しました。
Thymeleaf の Layout を使うと、ページを部品化・共通化できて、とてもいい感じに仕上がります。同じ記述を何度も書くなんて生産性も保守性も悪いですからね。これをうまく活用して、開発効率を上げたいものです。
あ、Tiles に慣れた方ならすぐに使えるようになると思いますよー^^
皆さんも試してみてください。
おつかれさまでした。