Spring BootでCSSやJSなどの静的コンテンツを配置する方法
Spring BootでCSSやJSなどの静的コンテンツを配置する方法です。

Spring Boot で静的コンテンツを配置する場所は ”src/main/resources” 配下に "static" や "public" のディレクトリを作って放り込めばよいです。
今回のサンプルでは、WebJars を使って Bootstrap や jQuery も入れてみます。
ここでは Spring BootでCSSやJSなどの静的コンテンツを配置する方法 を紹介します。
プロジェクト作成
とりあえず下記の pom.xml を参考に、Mavenプロジェクトを作ってください。
<project xmlns="http://maven.apache.org/POM/4.0.0" xmlns:xsi="http://www.w3.org/2001/XMLSchema-instance" xsi:schemaLocation="http://maven.apache.org/POM/4.0.0 http://maven.apache.org/xsd/maven-4.0.0.xsd">
  <modelVersion>4.0.0</modelVersion>
  <groupId>jp.demos.spbfe</groupId>
  <artifactId>spring-boot-frontend</artifactId>
  <version>0.0.1-SNAPSHOT</version>
  <parent>
    <groupId>org.springframework.boot</groupId>
    <artifactId>spring-boot-starter-parent</artifactId>
    <version>1.4.1.RELEASE</version>
  </parent>
  <properties>
    <java.version>1.8</java.version>
    <project.build.sourceEncoding>UTF-8</project.build.sourceEncoding>
    <thymeleaf.version>3.0.2.RELEASE</thymeleaf.version>
    <thymeleaf-layout-dialect.version>2.0.5</thymeleaf-layout-dialect.version>
    <thymeleaf-extras-springsecurity4.version>3.0.2.RELEASE</thymeleaf-extras-springsecurity4.version>
    <thymeleaf-extras-data-attribute.version>2.0.5</thymeleaf-extras-data-attribute.version>
    <thymeleaf-extras-java8time.version>3.0.2.RELEASE</thymeleaf-extras-java8time.version>
  </properties>
  <dependencies>
    <dependency>
      <groupId>org.springframework.boot</groupId>
      <artifactId>spring-boot-starter-web</artifactId>
    </dependency>
    <dependency>
      <groupId>org.springframework.boot</groupId>
      <artifactId>spring-boot-starter-thymeleaf</artifactId>
    </dependency>
    <dependency>
      <groupId>org.springframework.boot</groupId>
      <artifactId>spring-boot-devtools</artifactId>
    </dependency>
    <dependency>
      <groupId>org.webjars</groupId>
      <artifactId>bootstrap</artifactId>
      <version>3.3.7</version>
    </dependency>
    <dependency>
      <groupId>org.webjars</groupId>
      <artifactId>jquery</artifactId>
      <version>1.12.4</version>
    </dependency>
  </dependencies>
</project>
下記は bootstrap を使う場合の設定になります。バージョンは使いたいものに合わせて変更してください。
<dependency>
  <groupId>org.webjars</groupId>
  <artifactId>bootstrap</artifactId>
  <version>3.3.7</version>
</dependency>
下記は jQuery を使う場合の設定になります。バージョンは使いたいものに合わせて変更してください。
<dependency>
  <groupId>org.webjars</groupId>
  <artifactId>jquery</artifactId>
  <version>1.12.4</version>
</dependency>
Spring Bootセットアップ
エントリポイントとなる Application クラスと、コントローラークラス、トップページを作ります。
・Application クラス
package jp.demos.spbfe;

import org.springframework.boot.SpringApplication;
import org.springframework.boot.autoconfigure.SpringBootApplication;

@SpringBootApplication
public class Application {

  public static void main(String[] args) {
      SpringApplication.run(Application.class);
  }
}
・IndexController クラス
package jp.demos.spbfe;

import org.springframework.stereotype.Controller;
import org.springframework.web.bind.annotation.RequestMapping;
import org.springframework.web.bind.annotation.RequestMethod;

@Controller
@RequestMapping(value = "/")
public class IndexController {
  @RequestMapping(name = "/", method = RequestMethod.GET)
  String index() {
    return "index";
  }
}
・index.html
<!DOCTYPE html>
<html xmlns:th="http://www.thymeleaf.org">
<head>
<title>Spring Boot de Bootstrap</title>
<meta charset="UTF-8" />
<meta http-equiv="X-UA-Compatible" content="IE=edge" />
<meta name="viewport" content="width=device-width, initial-scale=1" />
</head>
<body>
</body>
</html>
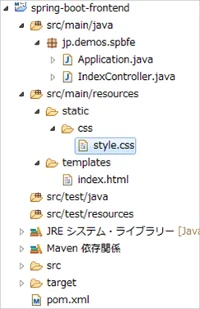
ここまで作るとこんな感じになります。

CSSの配置
src/main/resources 配下に static というフォルダーを作って、その中に css フォルダーを作ります。style.css を作って下記のように変更します。
@charset "UTF-8";
.container {
  border: 1px solid red;
  margin: 10px;
}
.row {
  margin: 10px;
  border: 1px solid blue;
}
HTMLの変更
<!DOCTYPE html>
<html xmlns:th="http://www.thymeleaf.org">
<head>
  <title>Spring Boot de Bootstrap</title>
  <meta charset="UTF-8" />
  <meta http-equiv="X-UA-Compatible" content="IE=edge" />
  <meta name="viewport" content="width=device-width, initial-scale=1" />
  <link rel="stylesheet" media="all" th:href="@{/css/style.css}"/>
  <link rel="stylesheet" media="all" th:href="@{/webjars/bootstrap/3.3.7/css/bootstrap.min.css}" />
</head>
<body>
<div class="container">
  <header>
    <h1>Spring Boot de Bootstrap</h1>
  </header>
  <div class="row">
    <div class="col-md-8 col-sm-8">
      <p>メインコンテンツ</p>
    </div>
    <div class="col-md-4 col-sm-4">
      <p>サブコンテンツ</p>
    </div>
  </div>
  <footer>
    <p>フッター</p>
  </footer>
</div>
<script type="text/javascript" th:src="@{/webjars/jquery/1.12.4/jquery.min.js}"></script>
<script type="text/javascript" th:src="@{/webjars/bootstrap/3.3.7/js/bootstrap.min.js}"></script>
</body>
</html>
ポイントは CSS の読み込みは th:href にて、「@{/css/style.css}」を設定することです。”src/main/resources” 配下の "static" や "public" の記述はしません。
Bootstrap や jQuery を使う場合の宣言は、"webjars" からのパスを設定すれば OK です。
起動確認
mvn clean / mvn test を実行して Application クラスを実行します。
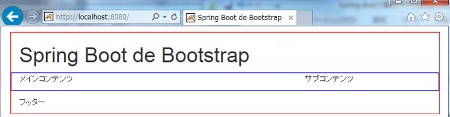
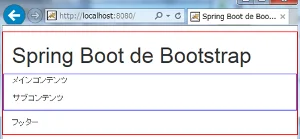
こんな感じで画面が出ますんで、ブラウザの幅を変更して Bootstrap が有効になっているかを確認しましょう。
まとめ
Spring BootでCSSやJSなどの静的コンテンツを配置する方法を紹介しました。
今回は書きませんでしたけど、オリジナルの javascript や jQuery で作られたプラグインなんかを使うときも、static 内に配置してあげればサクっと使えるようになります。パスの設定だけは間違えないようにしましょう。
次回は Thymeleaf の Layout について書こうかなー。
おつかれさまでした。