HandsontableとSpring BootでOracleからの検索結果を一覧表示する
Spring BootとHandsontableを連携し、Oracleからの検索結果を一覧表示する方法です。

Handsontable とは、JavaScript のライブラリで、ブラウザ上で Excel ライクなグリッドを実現できるのが特徴です。jQuery などのライブラリには依存していないのも、おすすめのポイントですね。
今回は Spring Boot と Handsontable で検索結果を一覧表示する ようなものを作ってみます。実務で使えるレベルか、しっかり検証したいと思います。
Handsontableは7.0.0以降、非営利目的以外はライセンスキーを購入する必要があります。
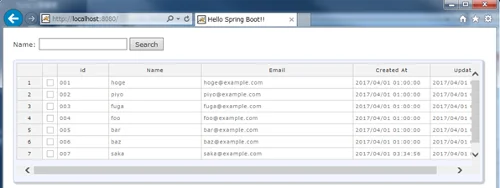
完成形
結論、こんな感じの画面ができます。
環境
- Spring Boot 1.4.1
- Thymeleaf 3.0.2
- Windows7
- Java8
- Eclipse 4.6 Neon
- Oracle 11g
- Handsontable 0.30.1
データベースには Oracle を使っています。もちろん、他のデータベースでもOKです。
こちらも参考にしてみてください。
プロジェクト作成
いつもどおり、Maven プロジェクトを作ります。
・pom.xml
<project xmlns="http://maven.apache.org/POM/4.0.0" xmlns:xsi="http://www.w3.org/2001/XMLSchema-instance" xsi:schemaLocation="http://maven.apache.org/POM/4.0.0 http://maven.apache.org/xsd/maven-4.0.0.xsd">
  <modelVersion>4.0.0</modelVersion>
  <groupId>jp.demos.sbhst</groupId>
  <artifactId>spring-boot-handsontable</artifactId>
  <version>0.0.1-SNAPSHOT</version>
  <parent>
    <groupId>org.springframework.boot</groupId>
    <artifactId>spring-boot-starter-parent</artifactId>
    <version>1.4.1.RELEASE</version>
  </parent>
  <properties>
    <java.version>1.8</java.version>
    <project.build.sourceEncoding>UTF-8</project.build.sourceEncoding>
    <thymeleaf.version>3.0.2.RELEASE</thymeleaf.version>
    <thymeleaf-layout-dialect.version>2.0.5</thymeleaf-layout-dialect.version>
    <thymeleaf-extras-springsecurity4.version>3.0.2.RELEASE</thymeleaf-extras-springsecurity4.version>
    <thymeleaf-extras-data-attribute.version>2.0.5</thymeleaf-extras-data-attribute.version>
    <thymeleaf-extras-java8time.version>3.0.0.RELEASE</thymeleaf-extras-java8time.version>
  </properties>
  <dependencies>
    <dependency>
      <groupId>org.springframework.boot</groupId>
      <artifactId>spring-boot-starter-web</artifactId>
    </dependency>
    <dependency>
      <groupId>org.springframework.boot</groupId>
      <artifactId>spring-boot-starter-thymeleaf</artifactId>
    </dependency>
    <dependency>
      <groupId>org.springframework.boot</groupId>
      <artifactId>spring-boot-starter-data-jpa</artifactId>
    </dependency>
    <dependency>
      <groupId>org.springframework.boot</groupId>
      <artifactId>spring-boot-devtools</artifactId>
    </dependency>
    <dependency>
      <groupId>org.thymeleaf.extras</groupId>
      <artifactId>thymeleaf-extras-java8time</artifactId>
    </dependency>
    <dependency>
      <groupId>org.projectlombok</groupId>
      <artifactId>lombok</artifactId>
    </dependency>
    <dependency>
      <groupId>com.oracle</groupId>
      <artifactId>ojdbc7</artifactId>
      <version>12.1.0</version>
    </dependency>
    <dependency>
      <groupId>com.fasterxml.jackson.datatype</groupId>
      <artifactId>jackson-datatype-jsr310</artifactId>
    </dependency>
    <dependency>
      <groupId>org.webjars</groupId>
      <artifactId>jquery</artifactId>
      <version>2.1.1</version>
    </dependency>
  </dependencies>
  <build>
    <plugins>
      <plugin>
        <groupId>org.springframework.boot</groupId>
        <artifactId>spring-boot-maven-plugin</artifactId>
        <configuration>
          <source>${java.version}</source>
          <target>${java.version}</target>
        </configuration>
      </plugin>
      <plugin>
        <groupId>org.apache.maven.plugins</groupId>
        <artifactId>maven-install-plugin</artifactId>
        <executions>
          <execution>
            <id>install-external</id>
            <phase>clean</phase>
            <configuration>
              <file>${basedir}/lib/ojdbc7.jar</file>
              <repositoryLayout>default</repositoryLayout>
              <groupId>com.oracle</groupId>
              <artifactId>ojdbc7</artifactId>
              <version>12.1.0</version>
              <packaging>jar</packaging>
              <generatePom>true</generatePom>
            </configuration>
            <goals>
                <goal>install-file</goal>
            </goals>
          </execution>
        </executions>
      </plugin>
    </plugins>
  </build>
</project>
・Application.java
package jp.demos.sbhst;

import org.springframework.boot.SpringApplication;
import org.springframework.boot.autoconfigure.SpringBootApplication;

@SpringBootApplication
public class Application {
  public static void main(String[] args) {
      SpringApplication.run(Application.class);
  }
}
・IndexController.java
package jp.demos.sbhst;

import org.springframework.stereotype.Controller;
import org.springframework.web.bind.annotation.RequestMapping;
import org.springframework.web.bind.annotation.RequestMethod;

@Controller
public class IndexController {
  @RequestMapping(value = "/", method = RequestMethod.GET)
  public String index() {
    return "index";
  }
}
src/main/resources 配下に templates フォルダーを作成する。
・index.html
<!DOCTYPE html>
<html xmlns:th="http://www.thymeleaf.org">
<head>
  <title>Hello Spring Boot!!</title>
  <meta charset="UTF-8" />
  <meta http-equiv="X-UA-Compatible" content="IE=edge" />
  <meta name="viewport" content="width=device-width, initial-scale=1" />
</head>
<body>
Hello Spring Boot!!
</body>
</html>
src/main/resources 配下に config フォルダーを作成し、application.yml を作ります。
・application.yml
spring:
  datasource:
    url: jdbc:oracle:thin:@localhost:1521:oracle
    username: scott
    password: tiger
    driverClassName: oracle.jdbc.driver.OracleDriver
  thymeleaf.mode: HTML
  thymeleaf.cache: false
ここまで作ると、こんな感じ。

ここまでで一度動作確認してみましょう。mvn clean & mvn test して Application.java を実行し、表示できれば OK です。

Oracleにテーブルとデータ作成
Oracleに接続して、テーブル作成とデータ投入をおこないます。
CREATE TABLE EMPLOYEES
(
  ID          NVARCHAR2(255) NOT NULL,
  NAME        NVARCHAR2(255) NOT NULL,
  EMAIL       NVARCHAR2(255),
  CREATED_AT  DATE NOT NULL,
  UPDATED_AT  DATE,
  CONSTRAINT PK_EMPLOYEES PRIMARY KEY (ID) USING INDEX
);
INSERT INTO EMPLOYEES VALUES ('001','hoge','hoge@example.com',to_date('2017/04/01 10:00:00','YYYY/MM/DD HH24:MI:SS'),to_date('2017/04/01 10:00:00','YYYY/MM/DD HH24:MI:SS'));
INSERT INTO EMPLOYEES VALUES ('002','piyo','piyo@example.com',to_date('2017/04/01 10:00:00','YYYY/MM/DD HH24:MI:SS'),to_date('2017/04/01 10:00:00','YYYY/MM/DD HH24:MI:SS'));
INSERT INTO EMPLOYEES VALUES ('003','fuga','fuga@example.com',to_date('2017/04/01 10:00:00','YYYY/MM/DD HH24:MI:SS'),to_date('2017/04/01 10:00:00','YYYY/MM/DD HH24:MI:SS'));
INSERT INTO EMPLOYEES VALUES ('004','foo','foo@example.com',to_date('2017/04/01 10:00:00','YYYY/MM/DD HH24:MI:SS'),to_date('2017/04/01 10:00:00','YYYY/MM/DD HH24:MI:SS'));
INSERT INTO EMPLOYEES VALUES ('005','bar','bar@example.com',to_date('2017/04/01 10:00:00','YYYY/MM/DD HH24:MI:SS'),to_date('2017/04/01 10:00:00','YYYY/MM/DD HH24:MI:SS'));
INSERT INTO EMPLOYEES VALUES ('006','baz','baz@example.com',to_date('2017/04/01 10:00:00','YYYY/MM/DD HH24:MI:SS'),to_date('2017/04/01 10:00:00','YYYY/MM/DD HH24:MI:SS'));
INSERT INTO EMPLOYEES VALUES ('007','saka','saka@example.com',to_date('2017/04/01 12:34:56','YYYY/MM/DD HH24:MI:SS'),to_date('2017/04/01 12:34:56','YYYY/MM/DD HH24:MI:SS'));
次に Oracle からデータ取得するクラスを作ります。
・Employees.java
package jp.demos.sbhst;

import java.io.Serializable;
import java.sql.Timestamp;

import javax.persistence.Entity;
import javax.persistence.Id;
import javax.validation.constraints.NotNull;

import com.fasterxml.jackson.annotation.JsonFormat;

import lombok.Data;

@Data
@Entity
public class Employees implements Serializable {
  @Id
  private String id;
  @NotNull
  private String name;
  private String email;
  @NotNull
  @JsonFormat(pattern = "yyyy/MM/dd HH:mm:ss", timezone = "Asia/Tokyo")
  private Timestamp createdAt;
  @JsonFormat(pattern = "yyyy/MM/dd HH:mm:ss", timezone = "Asia/Tokyo")
  private Timestamp updatedAt;
 }
Oracle DATE 型には、Timestamp 型を利用します。Jackson で日付型をフォーマットするために、@JsonFormat(pattern = "yyyy/MM/dd HH:mm:ss", timezone = "Asia/Tokyo") としています。タイムゾーンのデフォルトは GMT のため、変な計算がされるので必ず指定しましょう。
・EmployeesRepository.java
package jp.demos.sbhst;

import java.util.List;

import org.springframework.data.jpa.repository.JpaRepository;
import org.springframework.data.jpa.repository.Query;
import org.springframework.data.repository.query.Param;

public interface EmployeesRepository extends JpaRepository<Employees, String> {
  @Query(value="select * from employees where name like %:name% order by id", nativeQuery=true)
  List<Employees> findAllByLikeName(@Param("name") String name);
}
完成系の画面のとおり、検索条件には Name 入力を使います。
・EmployeesServiceImpl.java
package jp.demos.sbhst;

import java.util.List;

import org.springframework.beans.factory.annotation.Autowired;
import org.springframework.stereotype.Service;

@Service
public class EmployeesServiceImpl implements EmployeesService {
  @Autowired
  EmployeesRepository employeesRepository;
  @Override
  public List<Employees> findAllByLikeName(String name) {
    return employeesRepository.findAllByLikeName(name);
  }
}
・EmployeesService.java
package jp.demos.sbhst;

import java.util.List;

public interface EmployeesService {
  public List<Employees> findAllByLikeName(String name);
}
ふむ、これで Oracle からデータ取得できます。
次に Controller と Form クラスを追加して、画面からのアクセスに備えます。
・EmployeesForm.java
package jp.demos.sbhst;

import java.io.Serializable;

import lombok.Getter;
import lombok.Setter;

@Getter
@Setter
public class EmployeesForm implements Serializable {
  private String name;
}
・EmployeesController.java
package jp.demos.sbhst;

import java.util.List;

import org.springframework.beans.factory.annotation.Autowired;
import org.springframework.http.MediaType;
import org.springframework.web.bind.annotation.RequestBody;
import org.springframework.web.bind.annotation.RequestMapping;
import org.springframework.web.bind.annotation.ResponseBody;
import org.springframework.web.bind.annotation.RestController;

@RestController
public class EmployeesController {
  @Autowired
  EmployeesRepository employeesRepository;

  @RequestMapping(value = "/search", consumes=MediaType.APPLICATION_JSON_VALUE)
  @ResponseBody
  public List<Employees> search(@RequestBody EmployeesForm form) {
    return employeesRepository.findAllByLikeName(form.getName());
  }
}
これで、サーバーサイドのコーディングはおしまいです。
ここまで作ると、こんな感じになります。

さて、次はいよいよ Handsontable を使って、フロントエンドのコーディングをおこないます。
Handsontableをダウンロード
こちらのページから Handsontable をダウンロードします。
・Handsontable: JavaScript Spreadsheet Library for Developers
たくさんフォルダーとファイルがありますが、必要なのは dist フォルダー内の "handsontable.full.min.css"、"handsontable.full.min.js" だけです。
これを src/main/resources/static の中に配置します。
ここでは plugin/handsontable の中に配置しました。

Handsontableを使ってみる
次に Handsontable の制御と、ajax でデータ取得するコーディングをおこないます。
src/main/resources/static 配下に js/search.js を作ります。
・search.js
var colHeaders = ['', 'id', 'Name', 'Email', 'Created At', 'Update At'];
var colWidths = [30, 100, 180, 450, 150, 150];
var columns = [
    {type: 'checkbox', data: 'chkbox'}
   ,{type: 'text', readOnly: true, data: 'id'}
   ,{type: 'text', readOnly: true, data: 'name'}
   ,{type: 'text', readOnly: true, data: 'email'}
   ,{type: 'text', readOnly: true, data: 'createdAt'}
   ,{type: 'text', readOnly: true, data: 'updatedAt'}
   ];
var myTable = null;
var myData = [];
/**
 * 初期表示
 */
jQuery(document).ready(function() {
  myTable = createHandsontable(myData);
});
/**
 * リスト作成
 */
var createHandsontable = function( indata ) {
  var grid = document.getElementById("grids");
  return new Handsontable(grid, {
    data: indata,
    columns: columns,
    colHeaders: colHeaders,
    colWidths: colWidths,
    columnSorting: true,
    sortIndicator: true,
    startCols: colHeaders.length,
    wordWrap: false,
    rowHeaders: true,
    fillHandle: false,
    manualColumnMove: true,
    manualColumnResize: true,
    fixedColumnsLeft: 3,
    currentRowClassName: 'currentRow'
  });
}
/**
 * 検索
 */
$('#search').click(function() {
  var indata = parseJson($('#forms').serializeArray());
  $.ajax({
    type: "POST",
    url: "/search",
    dataType: "json",
    data: JSON.stringify(indata),
    contentType: 'application/json',
    scriptCharset: 'utf-8',
    success: function(otdata, dataType) {
      if ( otdata == null ) alert('データが0件でした');
      myData = otdata;
      if ( myTable != null )
        myTable.destroy();
      myTable = createHandsontable(myData);
    },
    error: function(XMLHttpRequest, textStatus, errorThrown) {
      alert('Error : ' + errorThrown);
    }
  });
});
/**
 * Json Parse
 */
var parseJson = function(data) {
  var returnJson = {};
  for (idx = 0; idx < data.length; idx++) {
    returnJson[data[idx].name] = data[idx].value;
  }
  return returnJson;
}
/**
 * リスト変更時
 */
Handsontable.hooks.add('afterChange', function(changes, source) {
  if ( changes == null ) return;
  var change = changes[0]; // [row, prop, oldVal, newVal]
  var row = change[0];
  var col = change[1];
  var newVal = change[3];
  var data = this.getData(); // reference to data object
  if ( col == 'chkbox' ) {
    if ( newVal )
      alert(row + "をチェック。")
  }
});
/**
 * リストダブルクリック時
 */
var afterSelectionStartTime = null;
var afterSelectionLastRow = -1;
var afterSelectionLastCol = -1;
Handsontable.hooks.add('afterSelection', function(row, col) {
  var data = this.getData(); // reference to data object
  if ( afterSelectionStartTime == null ) return;
  var diffTime = (new Date().getTime() - afterSelectionStartTime) / 1000;
  if ( afterSelectionLastRow == row && afterSelectionLastCol == col && diffTime < 0.3 ) {
    alert("ダブルクリック")
    afterSelectionLastRow = -1;
    afterSelectionLastCol = -1;
  }
});
Handsontable.hooks.add('afterSelectionEnd', function(row, col) {
  if ( col >= 1 && row >= 0 ) {
    afterSelectionLastRow = row;
    afterSelectionLastCol = col;
    afterSelectionStartTime = new Date().getTime();
  } else {
    afterSelectionLastRow = -1;
    afterSelectionLastCol = -1;
    afterSelectionStartTime = null;
  }
});
先頭の colHeaders、colWidths、columns で、Handsontable の引数である、ヘッダ―部の名前、列幅、型とデータ名を宣言しています。
後述しますが、"var grid = document.getElementById("grids");" としているのは、id="grids" という div が html 側に存在しているためです。この div の中を JavaScript で Spreadsheet 化してくれるのが Handsontable です。Handsontable を使う場合は、この div オブジェクトとオプションを指定してインスタンス化すればOKです。
下表は、今回利用した各オプションの説明です。
| オプション | 説明 |
|---|---|
| data | 表示データを指定する。 |
| columns | セルの型や書式など指定する。type には text、numeric、checkbox、autocomplete などがある。 |
| colHeaders | 各列のヘッダー名を指定する。 |
| colWidths | 各列の幅を指定する。 |
| columnSorting | 各列のヘッダ―部をクリックしたときに、ソートするかどうかを指定する。true: ソートする、false: ソートしない |
| sortIndicator | 各列のヘッダ―名横に、三角印を表示するかどうかを指定する。▲: 昇順、▼: 降順、なし: デフォルト。true: 表示する、false: 表示しない。 |
| startCols | 初期データが与えられなかった場合の列数を指定する。startRows もある。 |
| wordWrap | 列幅が指定されている場合、文字がセルに収まりきらなかったら折り返すかどうかを指定する。true: 折り返す、false: 折り返さない(収まりきらない部分が隠れる)。 |
| rowHeaders | 各行のヘッダーを表示するかどうかを指定する。デフォルトは1始まりの連番となる。true: 表示する、false: 表示しない。 |
| fillHandle | フィルハンドル(カーソルをドラッグすることで、セル値を上下 or 左右にコピーする)を使うかどうか指定する。true: 利用する、false: 利用しない。 |
| manualColumnMove | 各列のヘッダー部を、ドラッグ&ドロップで移動するかどうかを指定する。manualRowMove もある。true: 移動する、false: 移動しない。 |
| manualColumnResize | 各列のヘッダー部の列幅を、ドラッグで変更するかどうかを指定する。manualRowResize もある。true: 変更する、false: 変更しない。 |
| fixedColumnsLeft | 横スクロール時、固定する列数を指定する。fixedRowsTop で行数を固定することもできる。 |
| currentRowClassName | 選択した行のクラス名を指定する。選択行をハイライトできる。 |
指定できるオプションは、たくさんありすぎて紹介しきれないので、Handsontable公式サイト で確認ください。
Handsontable.hooks の add メソッドを使うことでイベントハンドラを登録できます。ここでは afterChange イベントを追加して、グリッドのイベントを監視します。カラムの型がチェックボックスで、値が変更されていたらアラートを出しています。
途中、"afterChange" と "afterSelection" でゴチャゴチャやっているのは、ダブルクリックのイベント監視のためです。0.3秒以内にクリックが2回あればダブルクリックとみなしています。なんでこんなことしているかといえば、どうにもダブルクリックのイベントハンドラを監視する方法がわからなかったので、自前でやることにしたからです。どなたかご存知の方がいればコメントいただけるとうれしいです。
ちなみに Handsontable.hooks.getBucket() で、全てのイベントハンドラを取得できます。
var grid = document.getElementById('grids');
var myTable = new Handsontable(grid);
var bucket = Handsontable.hooks.getBucket(myTable);
console.log(bucket);
検索処理は、お決まりの ajax & JSON です。細かな説明は割愛します。
次に スタイルシートで装飾します。
src/main/resources/static 配下に css/style.js を作ります。
・style.css
@charset "UTF-8";

/*
 * General Settings
 */
html,
body,
header,
footer,
section,
article,
nav,
div,
span,
p,
a,
img,
h1,
h2,
h3,
h4,
h5,
h6,
ul,
ol,
li,
l,
dt,
dd,
table,
tr,
th,
d,
strong,
address,
form,
figure,
pre {
  margin: 0;
  padding: 0;
}
img,
a img,
pre {
  border: 0;
}

body {
  color: #333;
  font-family: "ヒラギノ角ゴ Pro W3", "Hiragino Kaku Gothic Pro", Meiryo UI, Meiryo, Osaka, "MS Pゴシック", "MS PGothic", sans-serif;
  font-size: 12px;
  line-height: 1.5em;
  letter-spacing: 1px;
  -webkit-font-smoothing:antialiased;
  -moz-osx-font-smoothing:grayscale;
  font-smoothing:antialiased;
  margin: 20px;
  padding: 0;
}
input {
  color: #333;
  font-family: "ヒラギノ角ゴ Pro W3", "Hiragino Kaku Gothic Pro", Meiryo UI, Meiryo, Osaka, "MS Pゴシック", "MS PGothic", sans-serif;
}
.grid-list {
  padding: 5px;
  border: 1px solid #beccea;
  border-radius: 5px;
  background-color: #f1f5ff;
  background-image: linear-gradient(top, #fff 0%, rgba(255, 255, 255, 0) 2%);
  box-shadow: 2px 2px 2px 2px rgba(0, 0, 0, 0.2);
}
.grid-list .grids {
  width: 100%;
  height: 100%;
  background-color: #f1f5ff;
  color: #1d3994;
  overflow: auto;
  line-height: 1.5em;
  font-size: 10px;
}
.handsontable .currentRow {
  background-color: #e1faff;
}
最後に、index.html を変更しておしまいです。
・index.html
<!DOCTYPE html>
<html xmlns:th="http://www.thymeleaf.org">
<head>
  <title>Spring Boot de Handsontable!!</title>
  <meta charset="UTF-8" />
  <meta http-equiv="X-UA-Compatible" content="IE=edge" />
  <meta name="viewport" content="width=device-width, initial-scale=1" />
  <link rel="stylesheet" media="screen" th:href="@{/plugin/handsontable/handsontable.full.min.css}"/>
  <link rel="stylesheet" media="screen" th:href="@{/css/style.css}"/>
</head>
<body>
  <form id="forms" name="forms">
    <label>Name: </label>
    <input type="text" id="name" name="name" value="saka">
    <input type="button" id="search" value="Search">
  </form>
  <br>
  <div id="grid-list" class="grid-list" style="width:98%; height:50vh;"><div id="grids" class="grids" style="height:48vh;"></div></div>
  <script type="text/javascript" th:src="@{/webjars/jquery/2.1.1/jquery.min.js}"></script>
  <script type="text/javascript" th:src="@{/plugin/handsontable/handsontable.full.min.js}"></script>
  <script type="text/javascript" th:src="@{/js/search.js}"></script>
</body>
</html>
これでコーディングはおしまいです。こんな感じになっていると思います。

さて、いよいよ動かしますよー。
検証
mvn clean & mvn test して Application.java を実行します。
ブラウザからアクセスすると・・・

おお、表示されましたー^^
そのまま Search ボタンを押下すると・・・
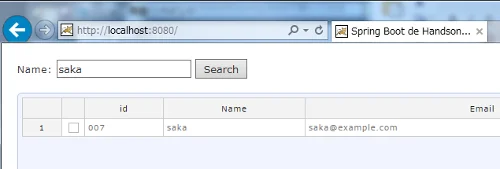
ふむ、1件だけ表示されましたね^^
気にしていた日時も正しく表示されています。

もちろん Name 欄を削除して Search ボタンを押下すれば・・・・、

おおおー、全件表示されたー^^
後は、並び替えたり、列を入れ替えたりして Handsontable の機能を堪能してください。

何か不具合を見つけたらコメントくださいね。直すかどうかはわかんないけど・・・^^;
まとめ
Spring BootとHandsontableを連携し、Oracleからの検索結果を一覧表示する方法を紹介しました。
Handsontable が、実務でも使えるスプレッドシートってことがよくわかりました。今回はリスト表示の機能として使いましたが、他にも様々なことができるツールです。
例えば、Excel で管理しているような仕組みも、容易に Web 化できるかもしれません。人は環境の変化に弱い生き物ですが、UI もさほど変わらないとなれば、受け入れてもらえるかもしれませんねー。個人の机(パソコン)にしまってあったデータを Web で集めて分析したら、すごい情報になったりして^^
というわけで、皆さんも試してみてください。
おつかれさまでした。